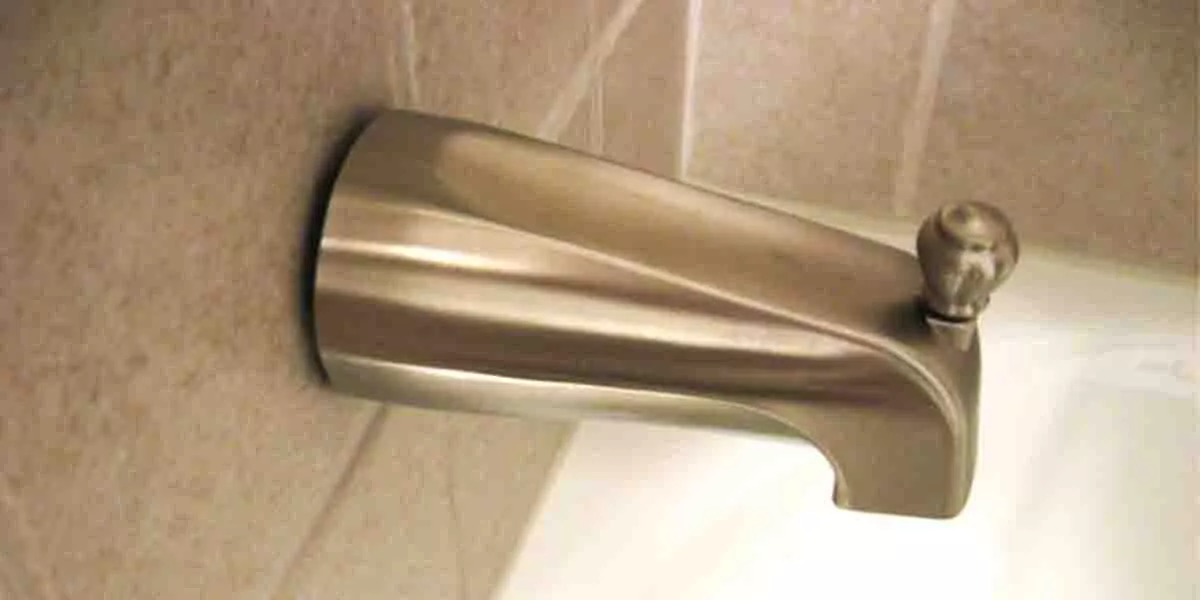
Tub spout not flushing with the wall is a common issue many individuals address when they move to a new or old house.
Besides, you may also need to fix the tub spout to flush with the wall when remodeling your bathroom to look good and align with the wall. Water splashing from a shower can cause damage to the wall behind, so it is better to fix this issue as soon as possible.
Well, you have landed on the right page as we will share with you simple DIY ideas to help you flush tub spout with the wall. Below are some of the DIY ideas you may use depending on the type of your tub spout.
But before we go further, you must know what you are dealing with by determining which type of tub spout you have.
How to Determine Your Tub Spout Type?
Before you start fixing it, it would be wise to determine the type of your tub spout to help you remove the tub spout and know what kind you need to replace or fix. Nonetheless, also to prepare the right equipment for handling the issue faster and straightforwardly.
To determine the type of your tub spout, you need to observe underneath the tub spout while still attached to the wall. If your tub spout is secured underneath by a tiny screw, then it is a slip-on tub spout. If it is not secured by a screw, it is a threaded tub spout.
How to Uninstall Tub Spout From the Nipple/Pipe?
Slip-On Tub Spout
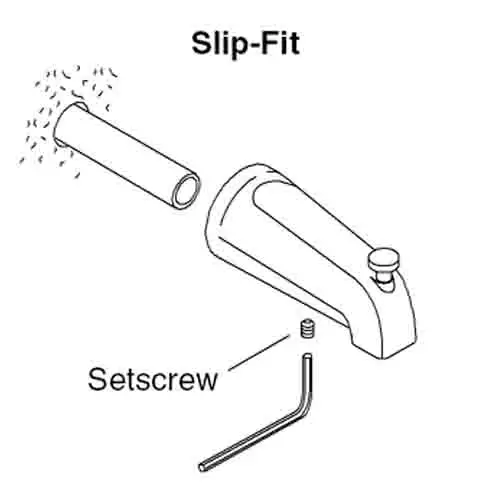
Slip-on-tub spouts lack threads, instead are designed to be installed by slipping them onto a copper pipe and secured by a screw at the bottom.
Thus, for you to uninstall it from the copper pipe you need to unscrew the screw at the bottom using a hex/Allen wrench or flathead screwdriver. Once it is loose, pull it out carefully, and if it is stubborn use both hands.
Threaded Tub Spout
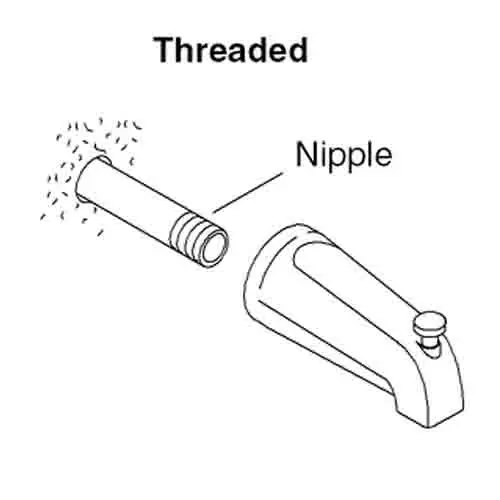
While threaded tub spouts have threads and there are designed in two styles. That is, a front-end threaded tub spout or a rear-end threaded tub spout. If you want to unscrew the threaded tub spout, you need to twist off counter-clockwise of the nipple or pipe.
If the threads are corroded or have flaked off, you need to use a large wrench pipe by securing it over the tub spout and then turn it counterclockwise to loosen.
How to Repair Tub Spout Not Flushing With the Wall (3 Methods)
When your tub spout doesn’t flush with the wall or leaves a space between the pipe nipple chances are the nipple is longer than the installation length of the tub spout. Or you installed the wrong type of spout.
To work on that you may employ the following methods.
Method 1: Cutting the Nipple Pipe
- Step 1: Measure the gap between the wall and secured end of the tub spout to know how much shorter the new nipple needs to be.
- Step 2: Uninstall the tub spout from the nipple pipe.
- Step 3: As per step 1, measure and mark equally all around the nipple to make sure the nipple and tub spout installation markings match and fit flush against the wall.
- Step 4: Cut the nipple using a tubing cutter. Do not use a hacksaw because it doesn’t leave a smooth edge as tubing cutter leaves.
- Step 5: Slide or thread the tub spout onto the pipe nipple until it flushes against the wall. If you are installing a slip-on tub spout, use a setscrew/flathead screw to tighten it. If it is threaded tub spout, thread by started slowly not to cross the thread and tighten until it snugs and aligns vertically against the wall.
You are done!
Method 2: Replace Threaded Nipple With A Shorter One
If your tub spout nipple has a threaded connecter that is longer, definitely the spout won’t flush vertically against the wall. That is if the threaded connector near the front is slightly too long than 2 or 3 inches long.
Therefore, if you have a 3-inch nipple that is too long, you need to replace it with a 2 1/2-inch nipple. If your tub spouts come with a plastic extension nipple with 2-3-inch threaded connectors, it is advisable to replace it with a one-inch nipple for it to fit vertically flush against the wall.
Method 3: Use A Plate Trim
Usually, the offset opening for the tub spout is ½ inch from the wall, but the gap sometimes may not look good depending on individual preference.
You can also compensate for the gap if the gap is about half an inch or less by using a trim plate. Visit any building hardware supply store nearby to look for a trim plate.
To install the trim plate uninstall the tub spout and install it behind the spout to compensate for the gap.
When you are done installing, it is advisable to seal around the base of the spout and around the trim plate with caulking silicone to protect the wall against water.
Wrap Up
With the above-mentioned methods, you can choose the one that you feel will provide the best result, depending on the type of your tub spout.
However, you should be cautious when trying to open threaded tub spouts because when they get rusty, it can be hard to remove them from the nipple.
Therefore, apply a significant force to avoid damaging both the nipple and tub spout. If it is rusty, apply oil around it and let it sit for a while to lessen the rigidness, and then open it.
Explore More On Tubs
- Can You Use Toilet Bowl Cleaner On A Bathtub? (Explained)
- 7 Tips On How to Remove Old Bathtub Sticker Residue
- Can you Use Magic Eraser On Bathtub? (Explained)
- Will Flex Seal Fix A Cracked Bathtub? (Explained)