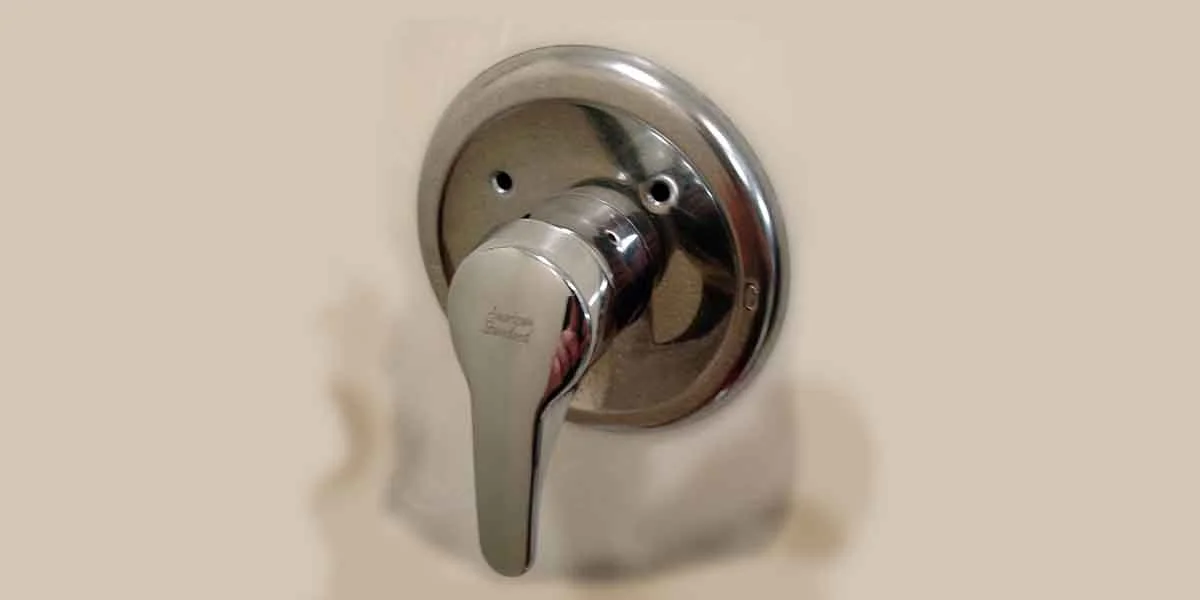
No doubt, American Standard fittings are top-notch in terms of quality and durability. The brand has a collection of different bathroom and kitchen fittings at a reasonable price range.
An American Standard Shower fitting gives an aesthetic look to your bath space for a long time. But at a certain point, you might need to replace the cartridge, adjuster ring, wall plate, or valve.
Because, over time, the parts of the shower fitting get corroded or malfunctioned, which needs to be replaced. For replacing a part with a new one, you will need to remove the shower handle of your American standard shower fitting.
In this guide, walk through the step-by-step process to remove an American standard shower handle. Let’s start with the safety measures.
Do This Before Removing Shower Handle
Shut Off Main Water Valve At Your House
If something goes wrong, then you could end up getting flooded with water.
To prevent yourself from getting drenched, it is recommended to shut off the main water supply valve at your house. But where you can find the shut-off valve?
Usually, the water shut-off valve is located inside the basement or crawlspace where the water line enters the home. In some cases, it is present near the water heater, garage, or mechanical room.
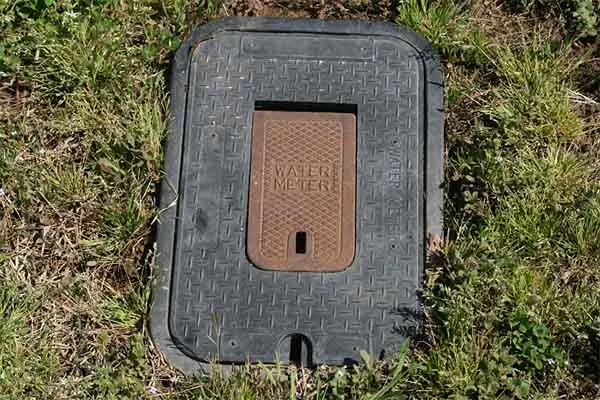
Also, you can look outside near the curb or sidewalk at the front of your property. There will be a water meter box under the ground.
Looks similar like:
Once found, shut off the water supply, use your hand or appropriate tools depending on what type of valve is in your home.
Drain Out Stagnant Water
Turning off the main water valve cuts off the water supply to the entire house.
However, some water remains stagnant in the pipeline. Ensure draining out all the remaining water before removing the shower handle.
To let the remaining water drain, turn on the shower and leave it like that until water stops.
Cover the Drain
While working, you will be dealing with small parts like screws and tiny pop-up covers. There is a high chance of losing if it falls into the drain.
Therefore, If you don’t want to lose any screws, cover the drain with a cloth.
How to Remove An American Standard Shower Handle? (6 Steps)
Tools & Other Essentials Required: Allen Wrench, Flathead-Screwdriver, Paint Can Opener, and Replacement Part (based on your problem).
Step 1: Take Off the Screws
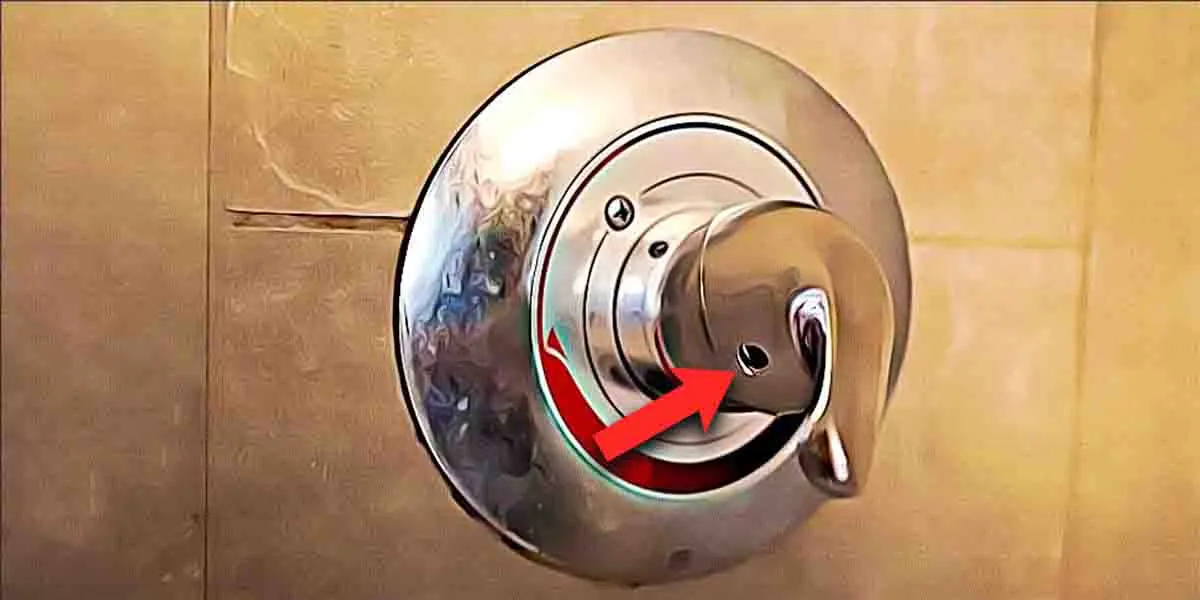
On the bottom of the American standard shower handle, there is a cover hiding the set screws.u003cbru003eu003cbru003ePop-out the cover and use an Allen wrench to loosen the set screws inside. Not necessary to take it all the way out.
Step 2: Remove the Shower Handle
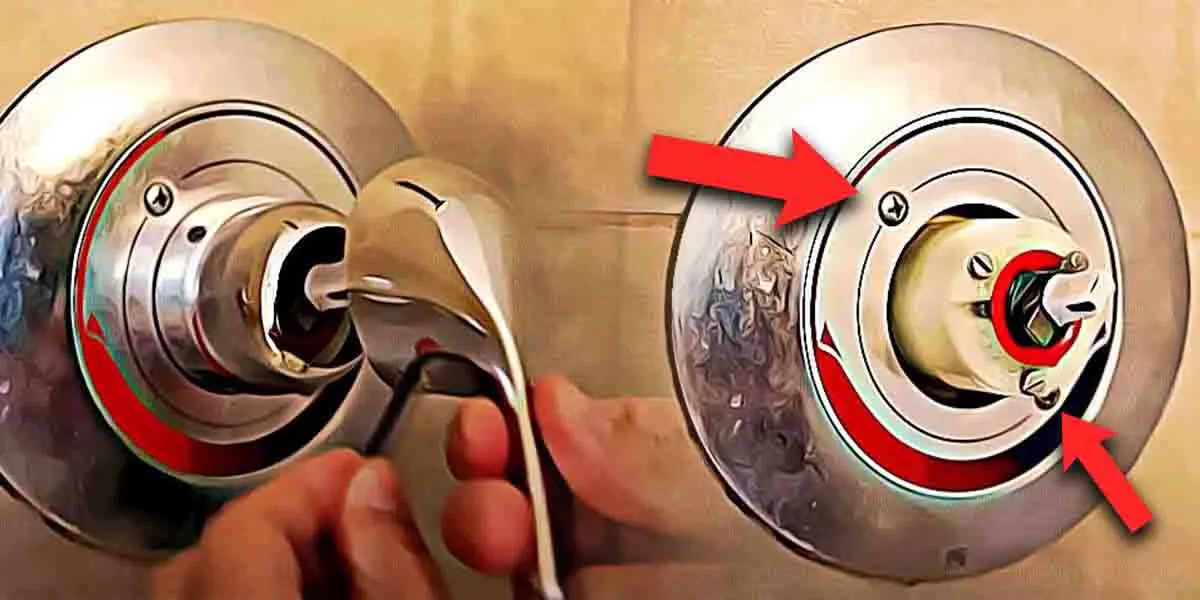
When the shower handles feel easy to lift, stop unscrewing and pull out the shower handle. Now, keep the handle safely aside.u003cbru003eu003cbru003eOnce removing the handle, you will notice two screws holding the cover plate to the bathroom’s tile wall. Use a flathead screwdriver to remove them.
Step 3: Take Out the Shower Valve
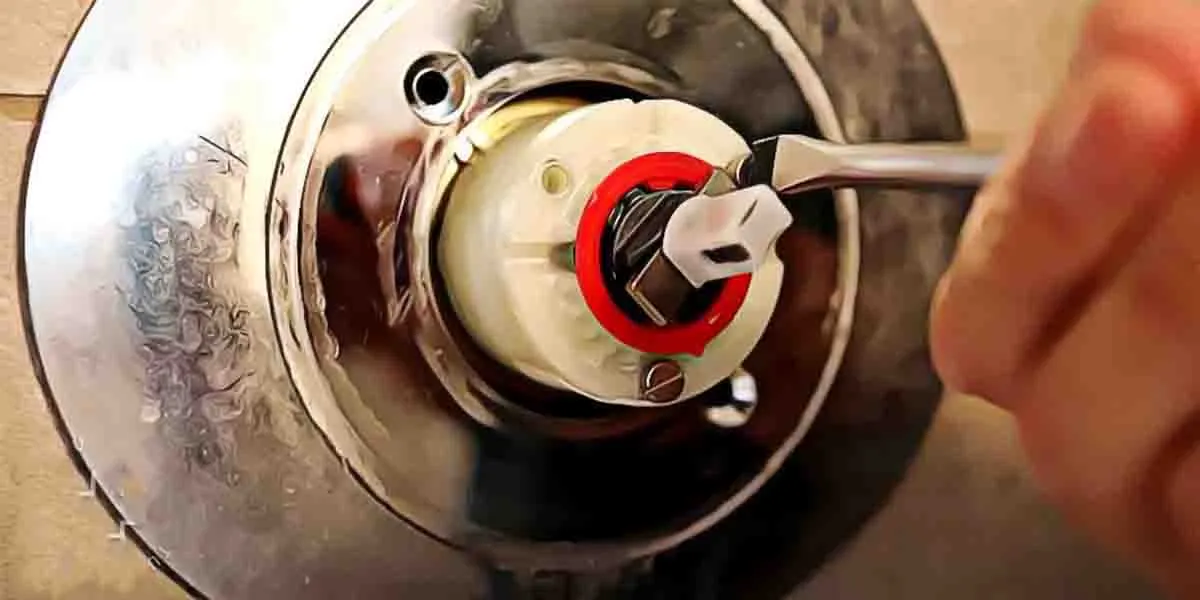
Now, you will be able to notice a cylindrical white-colored part. It is the shower valve that controls the flow of water.u003cbru003eu003cbru003eYou can take out the shower valve by unscrewing the three flathead screws. When unscrewing the last screw, hold the valve steady; so that it doesn’t fall off and break.
Step 4: Remove the Cartridge
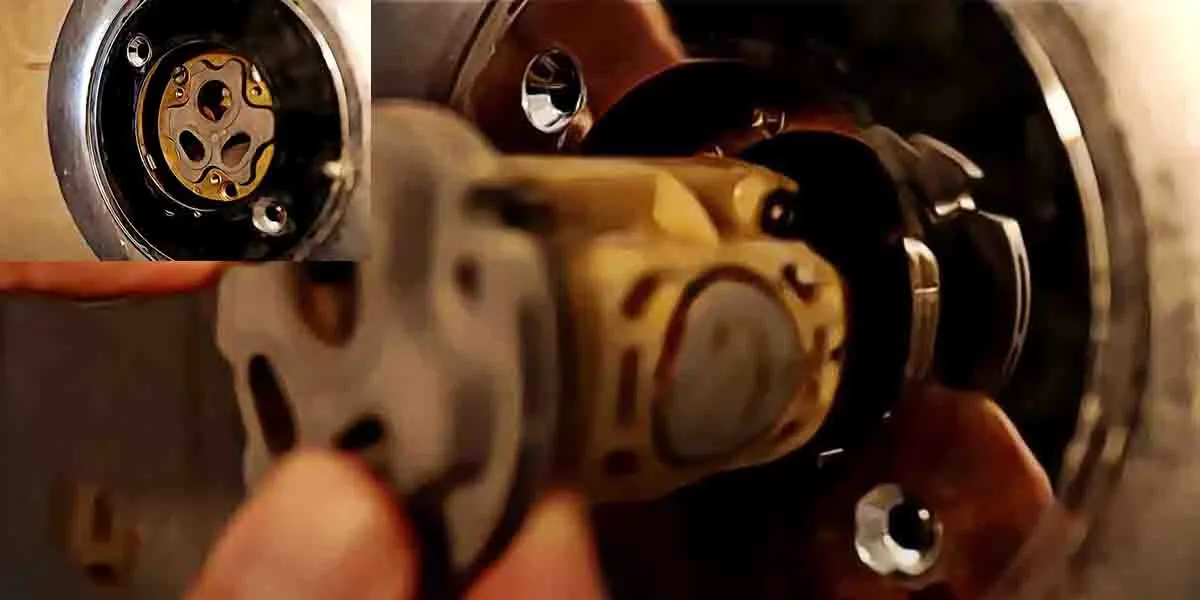
On removing the shower valve, you’ll be exposed to the cartridge, which is also known as the u003cstrongu003eAmerican standard pressure balancing unitu003c/strongu003e. It is responsible for balancing the water pressure between hot and cold water.u003cbru003eu003cbru003eHere a brass retaining ring (also known as O-Ring) is holding the cartridge. So remove it first. Take a flathead screwdriver and remove all three screws.u003cbru003eu003cbru003eBe careful with the screws and avoid dropping them into the wall gap.u003cbru003eu003cbru003eNow all left is the cartridge. Make sure you remember the alignment, the round opening is at the top, and the oval is at the bottom. I will recommend capturing this alignment with your phone’s camera.u003cbru003eu003cbru003eTo remove the cartridge, use a paint can opener to get a good grip. Insert the paint can opener in the outer ring slots and pull out the cartridge.
Step 5: Clean u0026amp; Replace
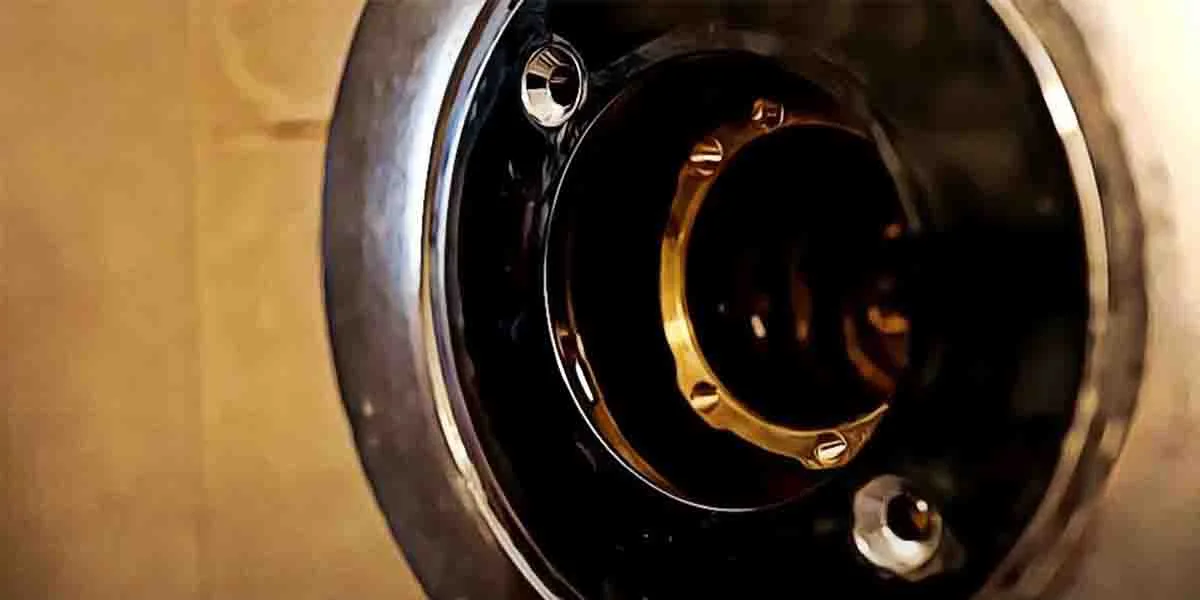
You’re almost done.u003cbru003eu003cbru003eNow, you can notice a big hole inside your bathroom’s wall. Check for any dust or debris and clean them.u003cbru003eu003cbru003eIf you are facing temperature adjustment issues, then probably the shower valve or adjuster ring has malfunctioned. In case water is dripping when the shower is off. Or facing difficulty turning the shower handle; it’s a sign to replace the cartridge.u003cbru003eu003cbru003eBased on your problem, you know which part needs a replacement. Keep the new parts available before reassembling.
Step 6: Re-Assemble u0026amp; It’s Done
In the final step, you will have to put everything back in its place.u003cbru003eu003cbru003eFirst, you need to install the cartridge back. u003cbru003eu003cbru003eEnsure the cartridge is properly aligned. For correct alignment, the round opening should be at the top, and oval at the bottom u003cemu003e(Refer to the image captured with your phone)u003c/emu003e. Then place the brass ring and screw it back with a flat head screwdriver.u003cbru003eu003cbru003eThen, reattach the shower valve. Be sure to align the valve opening with the cartridge opening and screw it back with a flat head screwdriver.u003cbru003eu003cbru003eSimilarly, re-attach the cover plate, slip back the collar. And place the handle back on the collar and secure it with the set screw.u003cbru003eu003cbru003eThat’s it! You have completed reassembling everything back. Well Done.
Wrap Up
Well, removing an American standard shower handle is an easy job. One with basic plumbing knowledge can easily work this out. Also, working this out on your own saves money and stops you from being dependent on plumbers.
If you are working on a replacement, identify the American standard shower fitting model installed in your bathroom and purchase the replacement parts accordingly.
Read More
- How to Remove A Stripped Screw from Shower Faucet
- How to Remove A Shower Head That Is Glued On?
- How to Remove a Stuck Shower Arm? (Only 3 Steps)