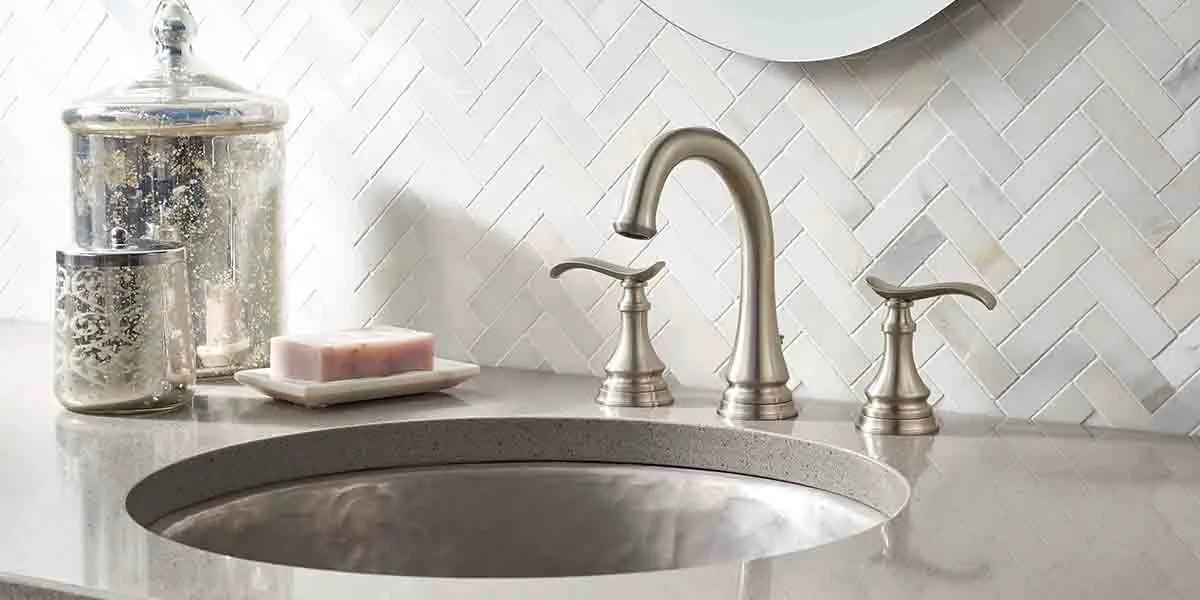
Moen offers a wide variety of faucet types, including center-set, single hole, wall mount, and widespread installation type. Talking about Widespread faucet style, they are mostly preferred for bathroom sinks with large counter space.
It seems you have purchased or planning to get a Moen widespread lavatory faucet. In that case, you might be in doubt whether you can install it on your own.
Do not worry! Installing Moen widespread has nothing to it.
In this guide, I will break down all the steps that take a successful Moen faucet installation from scratch. But before that, let me highlight a few things.
Related Moen Reads
Take A Note Before Installing
Check Installation Holes
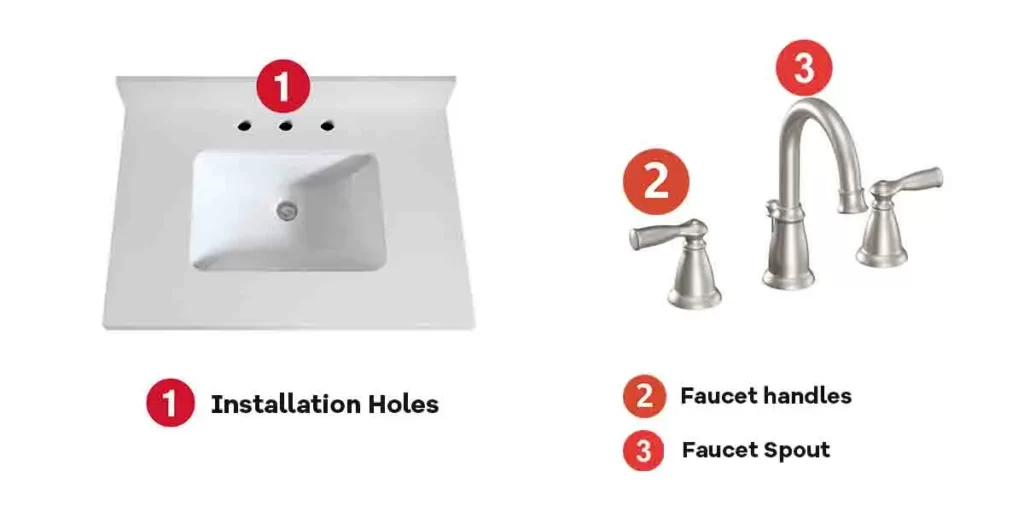
- Sink or Vanity top Installation Holes: Widespread faucet comes with separate handles to operate the faucet. In general, this style of faucets requires three installation holes. Typically, there will be either one or three installation holes in the sink or vanity top to install the faucet.
- Distance Between Holes: If you choose a widespread faucet, you don’t need to consider how far the holes are from each other, unless its an centerset style faucet. Remember, widespread faucets has independent spouts and handles, they aren’t connected to a base or each other so you’ll have flexibility in placing them.
Therefore, no need to worry about the hole’s distance measurement. Only make sure you have three installation holes on your sink or vanity top for installing the newly purchased widespread Moen faucet.
Changing the Drain Assembly
People ask a common question that is ‘Can I use my existing drain assembly when installing a new Moen faucet?’ Let’s see what Moen has to say:
“In most cases yes. But if you’re changing finishes, (i.e.,from chrome to brass), you’ll probably want to change the drain assembly to match your new faucet finish.”, says Moen.
Making it more clear, if you’re replacing your current Moen faucet with the same Drain Assembly configured faucet, you don’t need to change your Drain assembly. However, there are four possible scenarios where you have to install a new compatible drain assembly:
- Changing Faucet Finishes
- Changing Faucet Type (eg. Widespread to Wall mount)
- Installing A New Faucet from Scratch
- (In some cases) Replacing Old Faucet Brand with A New One
Moen recommends their MPACT Drain Assembly Kit for Widespread faucet installation. The kit includes necessary parts such as a hose connector, spout shank, valves, waste seat, drain body, and more. You will see the use later in this post. Remember, Once you set up the drain assembly, you can update the faucet style in the future without replacing the drain assembly’s plumbing, thanks to the common valve system.
How to Install Moen Widespread Bathroom Faucets
Note: Turn off the water inlets (pipe connecting sink to the water supply) located below the faucets. Do this to avoid getting drenched if anything goes wrong.
Step 1: Gather Your Tools
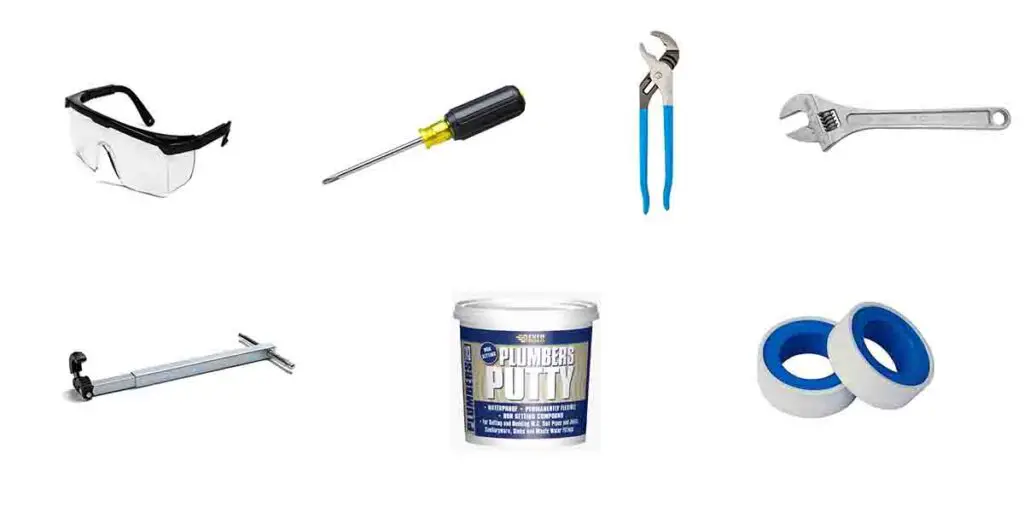
When starting up with the project, make sure you have the right tools. Here is a list of tools to keep handy while installing a Moen widespread bathroom faucet:
- Safety Glasses
- Phillips Screwdriver
- Adjustable Pliers
- Adjustable Wrench
- Basin Wrench
- Plumber’s Putty or Sealant
- Thread Seal Tape
Step 2: Mount Spout Shank & Valves
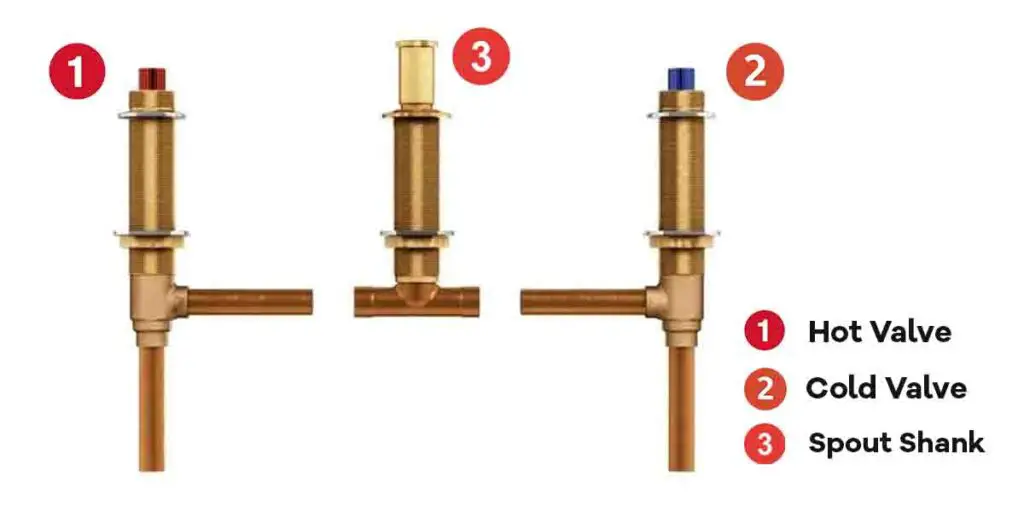
As you’re ready with the tools, you can start by mounting spout shank and valves to the bathroom’s sink or vanity top. Follow these steps to mount:
- Take spout shank, apply plumber’s putty (helps to prevent leaks) to its base. Also, do the same under the top mounting washers.
- Next, Install the spout shank into the center mounting hole. Make sure the O-rings present on the Spout Shank are facing towards you.
- Now, place the other two top mounting washers on either side of the hole.
- Take valve bodies, thread the lower mounting nuts onto the valve bodies so that the groove on each valve is 1/2-inch above the mounting washers.
- Then, slide the lower mounting washer to each valve’s body.
- Insert the hot valve body (red) into the left mounting hole and the cold valve body (blue) into the right mounting hole.
- For holding the valve in one place, take the clips and push them onto the groove of both valves.
Now all you need to do is install the mounting bracket under the spout shank. If your sink or vanity top is less than 1/4-inch, then it is recommended to use the entire mounting bracket. If it’s greater, only use the metal portion of that mounting bracket.
To install the mounting bracket, slide it to the base of the spout shank, and tighten it with a mounting nut. Then, tighten the lower mounting nuts on both valves (use adjustable pliers to secure them) and ensure the valve outlets are facing towards the spout shank.
Step 3: Attach the Hose Assembly

Once successfully mount the spout shank and valves, it’s time to attach the hose assembly that will direct the flow of water. Keep in mind, hose assembly connectors are not included with the faucet and are sold separately.
You can get Moen MPact 9000 Drain Assembly Kit which comes with an innovative duralock technology that allows attaching valve and spout shank’s outlets with the snap of a finger.
Simply, connect the middle connector to the spout shank’s outlet and the other two to both valve’s outlets. On a successful connection, you’ll hear a ‘clicking’ sound that indicates we are ready to proceed with the next step.
Step 4: Connect Water Supply Lines
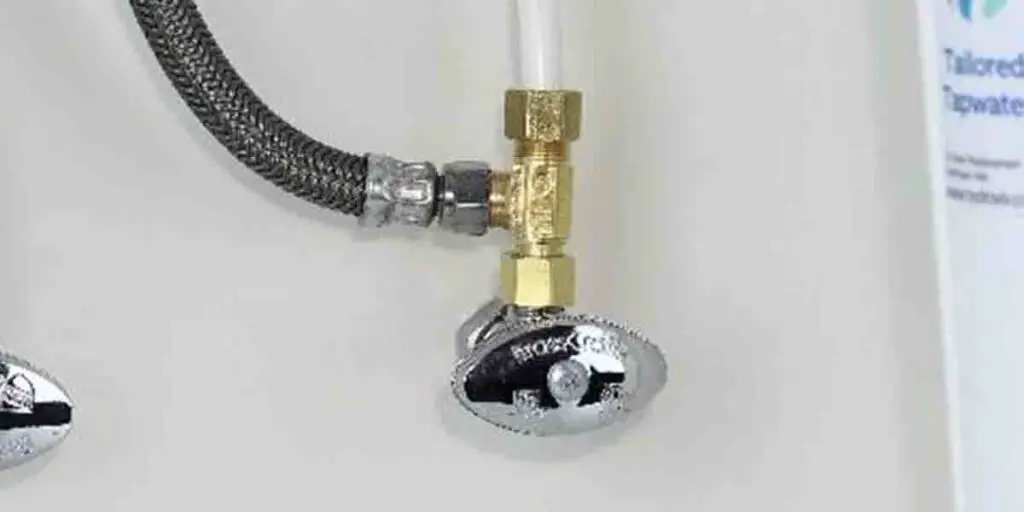
It’s time to connect the water supply lines. To do this, start by threading the water supply lines onto the valves. You can initially do this with your fingers. And after that, use adjustable pliers or basin wrench to tighten it fully.
Connect the other end of the hot and cold water supply lines to the inlets. You must use an adjustable wrench to tighten each connection, but ensure not getting it to overtighten.
Step 5: Mount the Faucet Spout & Handles
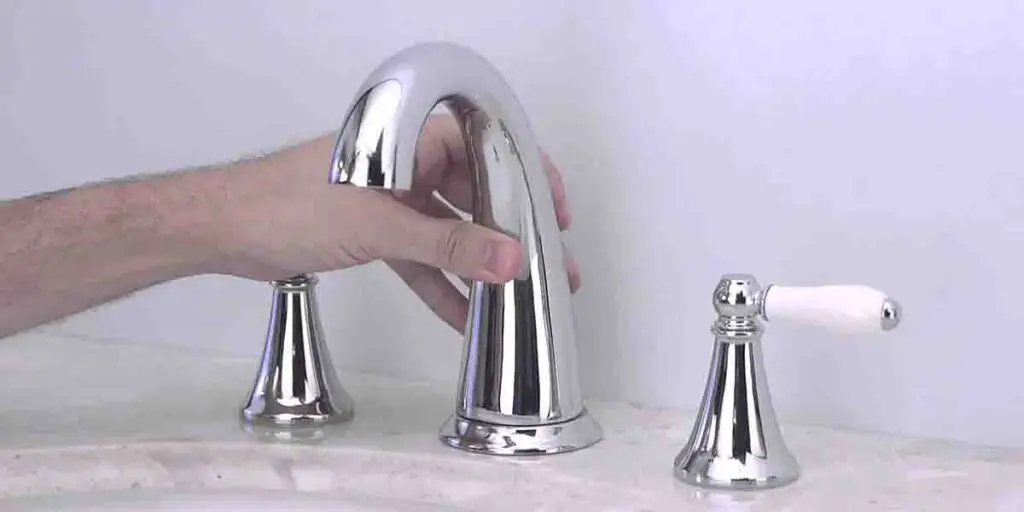
Do this First: Remember applying the plumber’s putty on spout shank & washers? If you notice excess plumber’s putty coming out, simply remove them.
For mounting the spout, first, apply the silicone grease on the O-rings of the spout shank as it helps to seat the O-Ring properly. Now, Insert a hex wrench through the spout’s lift rod opening and place it into the spout shank. Rotate the hex wrench clockwise to tighten the spout to the surface.
It’s not over yet.
Now for the faucet handles, start by making sure the valves are in an off position. Then, place the handle on each valve and tighten it using your hands. Your Moen faucet model might come with two caps that need to be placed on the top of each handle.
Step 6: Setup the Drain Assembly
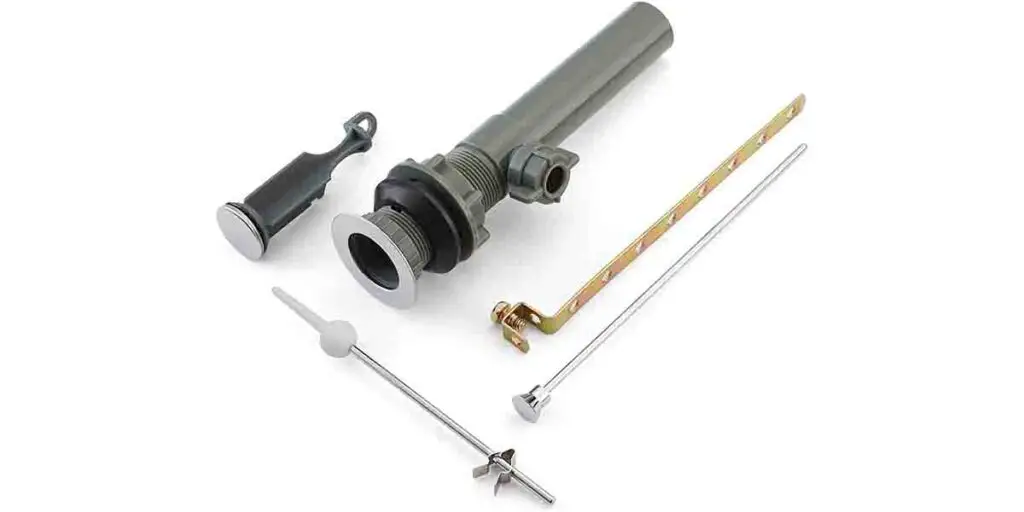
You’re almost done!
Once mounting the spout and handle, set up other components included with the Moen MPact 9000 Drain Assembly Kit. Follow these simple steps to set up the drain assembly:
- Take the waste seat and apply the plumber’s putty to its base. Then, place the waste seat in the drain’s opening, where the water drains out.
- Now wrap the tailpiece clockwise with a seal tape and thread it into the drain body. While holding the waste seat steady, thread the drain body onto waste seat’s base. Always ensure the pivot rod opening on the drain’s body faces the back of the sink.
- Then, push the gasket up to drain’s opeing and tighten the lower mounting nut below.
- Remove the pivot nut and slide the pivot rod nut onto the pivot rod. Then, insert the rod into the opening and tighten it.
- Now, take the lift rod and insert it into the spout’s opening.
- Place the popup plug also known as stopper into the drain hole.
- Slide the lift rod strap onto the lift rod for holding it in position.
- Finally, place the pivot rod clip into the proper hole in the lift rod strap.
Note: This step is only applicable if you’re doing the installation from scratch. If you previously had a compatible Moen valve assembly, then probably you’ve everything set up, allowing you to update the faucet style without replacing the plumbing.
Step 7: Flush the System to Check for Leaks
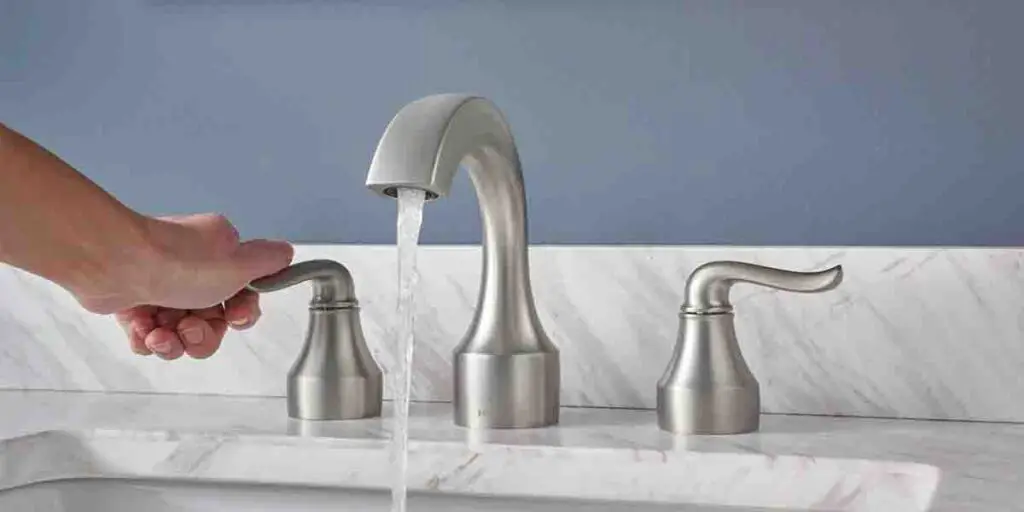
Finally, you need to check if everything is working as it should be. For that, remove the aerator from the spout. Turn on the water inlets and faucet handles to let the water run for a while. It will remove any dust or debris present inside as well as check for possible leaks.
If there is no leakage, put back the aerator. And you’re ready to go!
Well done! You’ve successfully installed your Moen widespread faucet.
Recommended Posts
- How to Remove Bathroom Sink Faucet Handle With No Screws
- Are Bathroom Sink Faucets Universal? (Explained)