Bathroom fans are key in removing unwanted odors and moisture from your space. So keeping them clean and running tip-top is important.
Luckily, learning how to clean a bathroom exhaust fan with a light is pretty easy. Follow along our step-by-step instructions below!
Right now, if you have noticed dust buildup, mold, or mildew on your bathroom exhaust fan, then it is the right time to clean it. We tend to not look up at these things, so you may not notice how dirty they get!
According to FamilyHandyMan, cleaning an exhaust fan every 6 months is necessary as this duration is enough for an exhaust fan to collect unwanted dust, mold and mildew.
These bathroom units are absolute magnets for built-up dust over time. Taking a few minutes extra every couple months will aid in keep them running smoothly and quietly for years to come.

Most users think that cleaning an exhaust fan is a headache. But don’t worry, I’ve outlined my simple & easy steps for you to get started.
How to Clean Bathroom Exhaust Fan with Light?
Step 1: Turn Off Light Switch or Breaker
For safety reasons, the very first step in cleaning an exhaust fan with or without a light is to cut the power.
Method 1 Switch Off:
If you have a circuit tester, you can safely prove that all power to the fan assembly is off after simply turning off the switch. Be sure to test with the switch on, then switch off to confirm no power is present, and that your tester is accurate. Note: Do not blindly trust that using your wall switch will cut all power supply. Some wiring is different, and the switch may not remove all power!
Method 2 Breaker Off:
The best way to guarantee that all power is removed from the circuit is by switching off power at your breaker panel. You will need to identify the proper breaker first. If you are having trouble finding the right breaker, it is a matter of turning off until you find the right one. This is a bit more work, but is the safest possible way to work on wired electrical connections in your home.
Remember: if you struggled to find which breaker was the one, its a good idea to label it now that you have it properly identified for the future!
Step 2: Remove Plastic Cover Plate
Now that you have removed all power to the bathroom fan, the next step involves identifying your style of fan/light to then remove the light cover diffuser. This is done by one of the following methods:
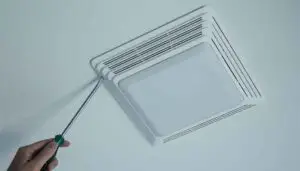
METHOD 1 PLASTIC FLUSH MOUNT MODERN STYLE:
For a modern plastic light and fan assembly like the one pictured above, you will need a thin tool to remove the cover. I like to use a butter knife or a plastic putty scraper.
Get the edge of the tool gently underneath the light diffuser, firmly twist or pry the diffuser away from the fan base. The light cover will pop off easily once you get it away a half in or so.
Using both hands, free up the remaining tabs of the cover, remove it completely and set it aside to clean.
METHOD 2 CENTER SCREW STYLE:
For traditional styled center screw bathroom fan lights, a style that was very popular in the 1990s, you will simply need to unscrew the center hub to free up the light cover.
Be sure to take your time, carefully unscrew the center hub and support the light cover as it becomes free. These are heavier than the modern plastic covers, and will have a chance to break! Set this aside for cleaning.
METHOD 3 GLASS FLUSH MOUNT STYLE:
These types of fan/light assemblies are more robust and premium units. The light cover is usually frosted glass rather than plastic, and the removal of the cover differs from Method 1.
To remove these glass diffusers, you will use both hands to gently push up while turning counterclockwise. This will release the glass cover once you unset it from its holding position. Be sure to have a firm grasp on the cover using both hands, and set it aside for cleaning.
Step 3: Remove Light Bulb
Now that you have removed the cover to your light, you will notice that the light bulbs are magnets for dust and grime!
They tend to get that ‘baked on’ grime in a bathroom environment with the increased humidity.
You will want to unscrew your bulb(s) to clean them properly. Set the bulbs aside.
I like to put my lightbulbs into my light cover, set on my bathroom vanity or in my tub or shower base so they are safe from falling and breaking.
Step 4: Remove Center Nuts
On removing the bulb, you will get exposed to center nuts. Center nuts hold base plate assembled to the center post. To remove, use flat head pliers or screwdrivers.
When I was removing mine, some of the nuts fell into the shower. To avoid this, place a towel over the drain to catch any stray nuts if they drop!
Step 5: Remove Fan Housing
As you have removed the nuts, the housing will drop down freely. I recommend you to pull it slowly as there is a wire connector that needs to be unplugged. Unplug the light kit from the ceiling fan and keep it aside for cleaning.
Removing the fan assembly out of the ceiling isn’t necessary. Leaving this installed is fine. Don’t worry, it is still cleanable.
Step 6: Start Cleaning
Once you have removed everything, it’s time to clean all parts one after the other.
For the bulb, once it is cool to touch, clean it by using a light spray of windex and wiping down with a cloth or paper towel.
For the fan cover plate I like to let it soak for a few minutes in soapy water in the sink. Afterwards its easy to gently clean the loosened debris.
To clean plastic fan housing, you can soak it the same way in warm soapy water.
To clean fan blades they are usually the dirtiest. You can use a small brush or vacuum. A vacuum will be more useful to reach hard-to-remove clumps of dust. Be careful not to bend the fan blades by applying excessive force. After vacuuming, wipe down the blades with a damp cloth.
Step 7: Reassemble Everything
After giving everything (light bulb, cover plate, grating, and fan blades) a good cleaning, reinstall the parts.
When reassembling the fan’s cover plate, ensure that you have plugged the wire, which was initially unplugged (in step five). Now, attach the grating and screw the nuts properly.
Put the light back and light cover back in its place (ensure it is dry).
Lastly, Turn on the power and test it.
How Often to Clean Bathroom Exhaust Fan?
A bathroom exhaust fan needs to be cleaned at regular intervals to prevent dust build-up. If your exhaust fan is running under normal usage, consider cleaning every 6 months. This will keep it running efficiently.
Continuous usage of a bathroom exhaust fan will attract more moisture and dust which can result in mold and mildew formation. If you tend to keep your bathroom fan running a lot, consider cleaning it every 3 months.
Failing to clean your bathroom fan regularly will impact its performance greatly. Make this part of a seasonal cleaning regimen. See my latest post on useful bathroom cleaning hacks for more great ideas!
| Usage | Cleaning Frequency |
| Normal (fan running when bathroom in use) | 6 months |
| Excessive (fan running continuosly, 24/7) | 3 months |
FAQ: Cleaning Bathroom Exhaust Fan with Light
Can you clean light bulbs in water?
Its best to not submerge a bulb directly in water. Instead, use a damp cloth or paper towel to wipe the dust away. I like to use a paper towel sprayed with a bit of windex. Easy! Ensure the bulb is dry before re-installing and use.
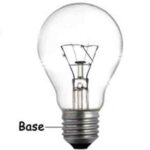
Avoid cleaning the electrical contact (base) to prevent unnecessary corrosion.
How to Clean Fan Plastic Cover Plate?
If your cover plate is very dirty, you should soak it in soapy water while you work on cleaning the rest of the fan assembly and parts. The cover plates tend to get discolored and grimy over time. Once it has soaked, wipe it clean with a cloth or paper towel, dry it and re-install into the fan.
How to clean the fan blades?
You can either use a toothbrush or vacuum. Really, using both is best especially if your fan blades are very dirty. Using the toothbrush to loosen up the built-up debris while vacuuming will get most of the blades clean. The vacuum should instantly suck up the caked-on dust and grime so you don’t have to sweep it up after. Be especially careful to not put too much pressure on the fan blades as they can be weak, more so if your fan is older.
Do I need to worry about electric shock?
If you follow the steps noted above, by turning off your switch or by flipping off your circuit breaker, you need not worry at all. You bathroom fan assembly will not have power running to it, and is completely safe to clean inside. Just follow our easy steps and you’ll have a clean bathroom fan and light in no time!
Related Posts